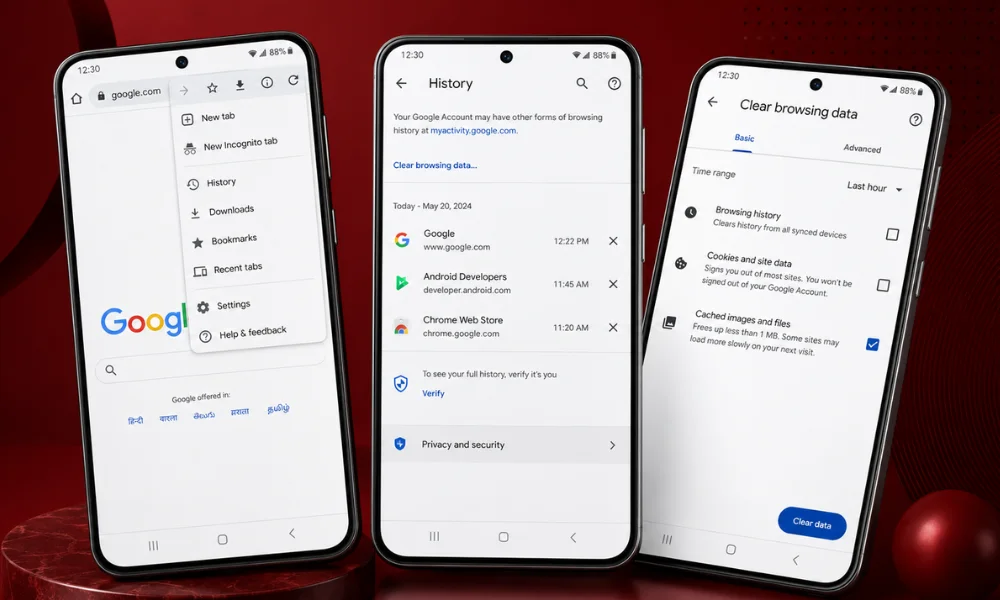


Quick Answer
To clear cache in Chrome:
- Open Google Chrome.
- Click the three-dot menu in the top-right corner.
- Select Delete browsing data.
- Choose a Time range.
- Check Cached images and files.
- Click Delete data.
If you only want to remove cached files, leave options like passwords and autofill unchecked.
If websites are loading slowly, showing old content, or not working as expected, your browser cache could be the reason. Chrome stores temporary website files to help pages open faster, but over time those files can become outdated or corrupted. As a result, you may notice broken layouts, missing images, or login problems.
Fortunately, clearing the cache only takes a minute. Whether you’re using Windows, Mac, Android, iPhone, or a Chromebook, this guide walks you through every step in simple language.
What Is Cache in Chrome?
Cache is a collection of temporary files that Chrome saves while you browse the web. These files include images, scripts, fonts, and other website resources.
The next time you visit the same website, Chrome loads these saved files instead of downloading everything again. This makes pages open faster and reduces data usage.
However, the cache isn’t perfect. If the stored files become outdated, Chrome may continue showing an old version of a page even after the website has been updated.
Examples of Cached Files
| Cached Item | Why Chrome Saves It |
|---|---|
| Images | Faster page loading |
| Logos | Avoid downloading again |
| CSS files | Display page design quickly |
| JavaScript | Improve website performance |
| Fonts | Load text faster |
Why Should You Clear Chrome Cache?
Most people don’t need to clear their cache every day. Still, there are situations where deleting it can solve frustrating browser problems.
You should consider clearing the cache if:
- Websites look broken.
- Images are missing.
- Pages refuse to update.
- Chrome feels slower than usual.
- A website keeps showing old information.
- You’re troubleshooting browser errors.
- You want to free some storage space.
Benefits of Clearing Cache
| Benefit | Explanation |
|---|---|
| Fixes loading issues | Removes outdated files that may conflict with newer website versions. |
| Improves troubleshooting | Helps identify whether cached data is causing problems. |
| Frees storage | Deletes temporary files that are no longer needed. |
| Displays updated websites | Forces Chrome to download the latest website files. |
What Happens After You Clear Cache?
Many users worry they’ll lose important information. In most cases, that doesn’t happen.
When you delete only cached images and files:
| What Happens | Result |
|---|---|
| Cached files are removed | Yes |
| Websites load fresh content | Yes |
| Saved passwords stay | Yes, if not selected |
| Bookmarks remain | Yes |
| Extensions stay installed | Yes |
| Browsing history stays | Yes, unless you choose to remove it |
The first visit to a website may feel slightly slower because Chrome needs to download fresh files again. After that, browsing returns to normal.
Cache vs Cookies
Many people confuse cache with cookies, but they serve different purposes.
| Cache | Cookies |
|---|---|
| Stores temporary website files | Stores login sessions and preferences |
| Helps websites load faster | Helps websites remember you |
| Usually fixes display issues | May sign you out when deleted |
| Mainly improves speed | Mainly improves personalization |
Knowing the difference helps you choose the right option before deleting browsing data.
How to Clear Cache in Chrome on Windows, Mac, and Chromebook

The process is almost identical across desktop devices.
Step 1: Open Chrome
Launch Google Chrome on your computer.
Step 2: Open the Menu
Click the three dots in the upper-right corner.
Step 3: Open Delete Browsing Data
Select Delete browsing data from the menu. You can also reach this screen through Settings → Privacy and Security → Delete browsing data.
Step 4: Select a Time Range
Choose one of the available options:
- Last hour
- Last 24 hours
- Last 7 days
- Last 4 weeks
- All time
If you’re trying to fix a persistent issue, All time is usually the best choice.
Step 5: Select Cached Images and Files
Tick Cached images and files.
If you don’t want to lose saved passwords or autofill information, leave those options unchecked.
Step 6: Delete the Cache
Click Delete data.
Chrome will remove the cached files. Depending on how much data has accumulated, this may take anywhere from a few seconds to a minute.
Keyboard Shortcut to Open the Clear Browsing Data Window
Instead of navigating through settings, you can use a shortcut.
| Device | Shortcut |
|---|---|
| Windows | Ctrl + Shift + Delete |
| Chromebook | Ctrl + Shift + Delete |
| Mac | Command + Shift + Delete |
This opens the Delete browsing data window immediately, saving a few clicks.
Choosing the Right Time Range
Selecting the correct time range depends on what you’re trying to fix.
| Time Range | Best For |
|---|---|
| Last hour | Recent browsing issues |
| Last 24 hours | Problems after a recent update |
| Last 7 days | Weekly cleanup |
| Last 4 weeks | General maintenance |
| All time | Persistent website or browser issues |
Common Mistakes to Avoid
Before you click Delete data, keep these tips in mind.
- Don’t check Passwords and Passkeys unless you really want to remove saved logins.
- Avoid deleting everything if you’re only trying to refresh one website.
- Make sure Cached images and files is selected.
- Refresh the website after clearing the cache to load the newest version.