Have you ever wondered how Facebook knows what ads to show you? Also, you don’t know what a Pixel is in Facebook Ads. Do you feel lost trying to understand what a pixel in Facebook ads does? Don’t worry, you’re not alone, and we’ve got you covered.
A Facebook Pixel is a small but powerful tool that tracks user actions on your website. This helps you optimize ads, measure success, and boost conversions. In this guide, you’ll learn what a Pixel is in Facebook ads, why it matters, and how to set it up.
So, let us learn and optimize your ad campaigns.
What is a pixel in Facebook ads, and How Does it work?
A Facebook Pixel is a tiny code added to your site to track your audience. It tracks visitor actions like purchases or sign-ups. This data shows how users engage with your site after clicking your Facebook ads.
How Does It Work?
Facebook Pixels work by:
Tracking User Actions (Events)
When someone visits your site and takes any action, like a purchase or adding to their cart, the Pixel tracks this “event” and shares it with Facebook.
Cookie-Based Functionality
The Pixel uses browser cookies to track visitors’ movements across your site. It can then attribute these actions to specific Facebook ads they interacted with before visiting your website.
Real-Time Reporting
The data collected helps you monitor ad performance in real-time, optimize ongoing campaigns, and build custom or lookalike audiences for better ad targeting.
The Facebook Pixel connects your ads to customer actions, providing data to craft smarter, high-converting campaigns. You can retarget visitors who didn’t convert and build lookalike audiences to find new customers. It sharpens ad targeting and maximizes your ROI effectively.
Why Are Facebook Pixels Important?
Facebook Pixels act as your advertising GPS, ensuring you know where your ad dollars go and how to improve performance. However, You get the following benefits from the Facebook Pixel:
Better Targeting
The Pixel helps you build custom audiences by tracking real user actions. It lets you retarget visitors interested in your products but didn’t buy. For Example, if someone adds an item to their cart but leaves, the Pixel helps you target them with reminders or special offers.
More competent Ad Optimization
With Pixel data, Facebook’s algorithm gets smarter. It learns what actions matter most to your business (like purchases or leads) and delivers ads to people more likely to take those actions. This increases conversion rates and lowers ad costs.
Insightful Analytics
The pixel in Facebook Ads provides detailed reports on user activity, showing what works and what doesn’t. You’ll know which ads drive the most traffic, sales, or sign-ups, enabling better decisions.
Building Lookalike Audiences
The Pixel helps you create lookalike audiences by analyzing your best customers. Facebook then finds similar people likely to engage with your ads or buy your products.
Track Cross-Device Actions
The Pixel tracks actions across devices. It shows if someone clicked your mobile ad and completed a desktop purchase, giving you a complete view of customer journeys. However, The Pixel ensures your ads perform well, saving money and growing your business.
How do you create a pixel in Facebook ads?
You must create a Facebook Pixel to track and optimize your Facebook ads and increase ROI. Follow these simple steps to set it up:
1. Access Events Manager
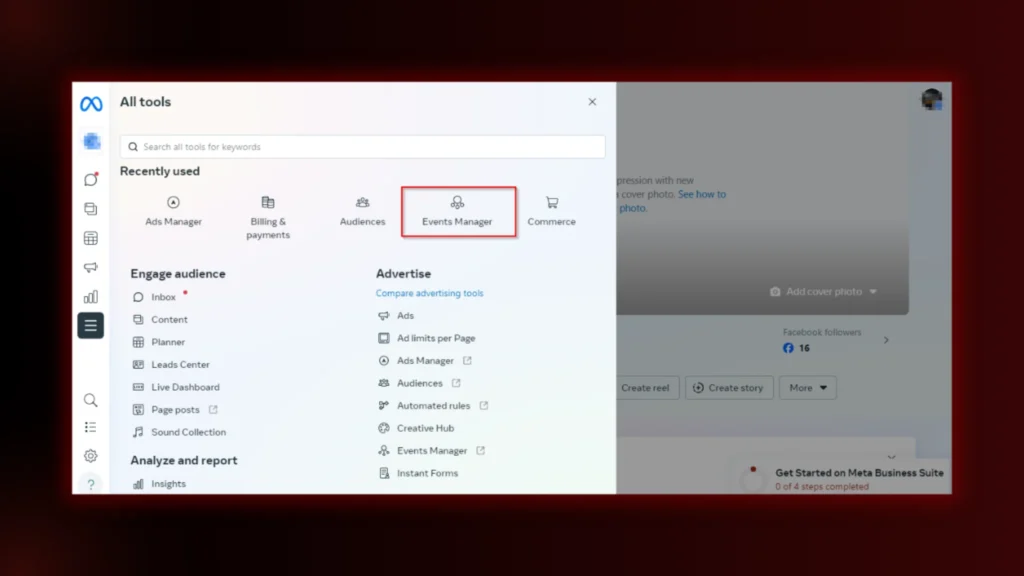
- Log in to your Facebook Business Manager.
- Click on the menu icon (three horizontal lines) in the top-left corner.
- Select Events Manager under the “All tools” section.
2. Create a New Pixel
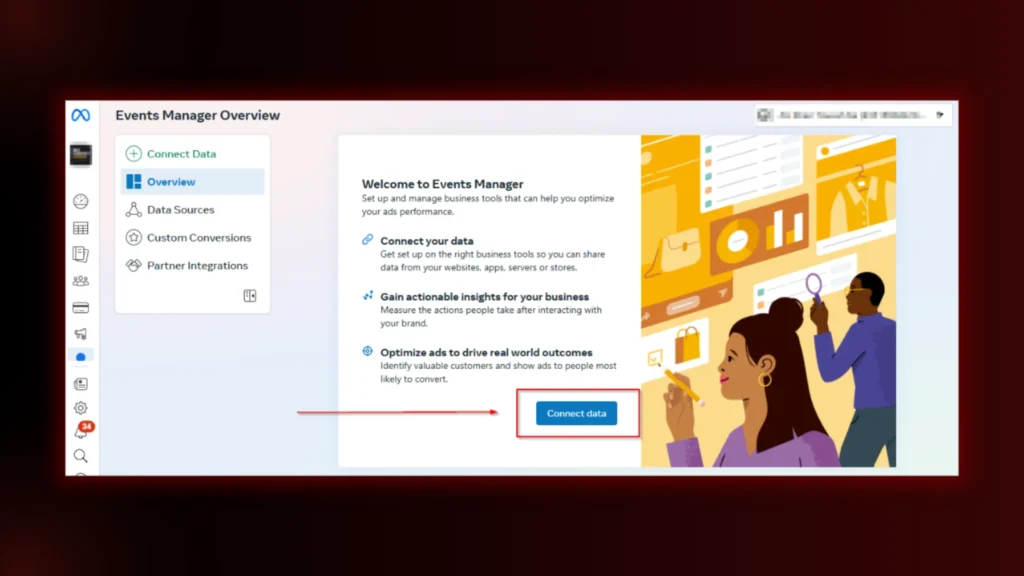
- In Events Manager, click the Connect Data Sources button.
- Choose the Web as the data source.
- Click Connect.
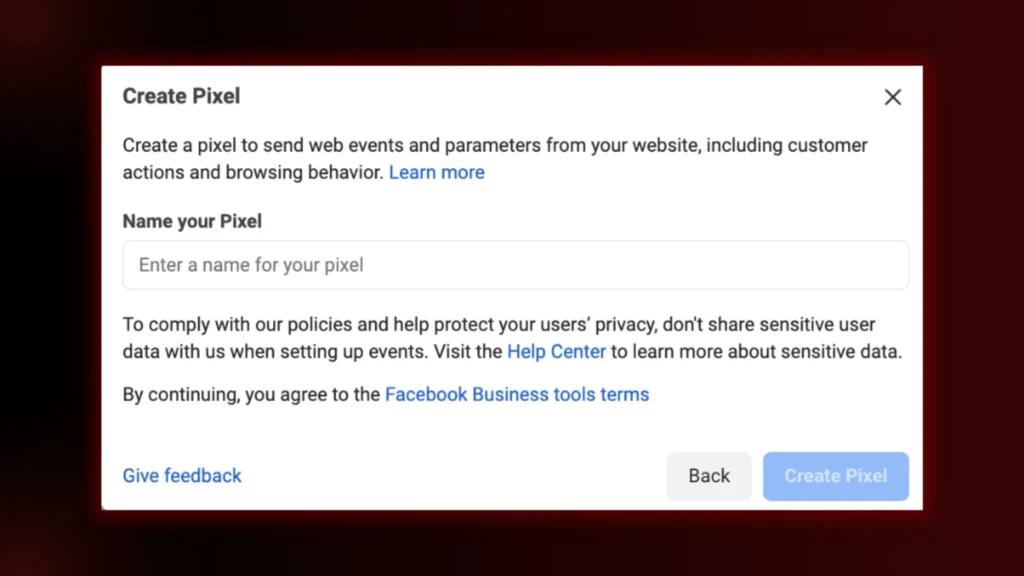
- Name your Pixel and add your website URL to create it.
- Click Continue to create your Pixel.
3. Add Pixel Code to Your Website
After creating the Pixel, you’ll see options to add the code to your website.
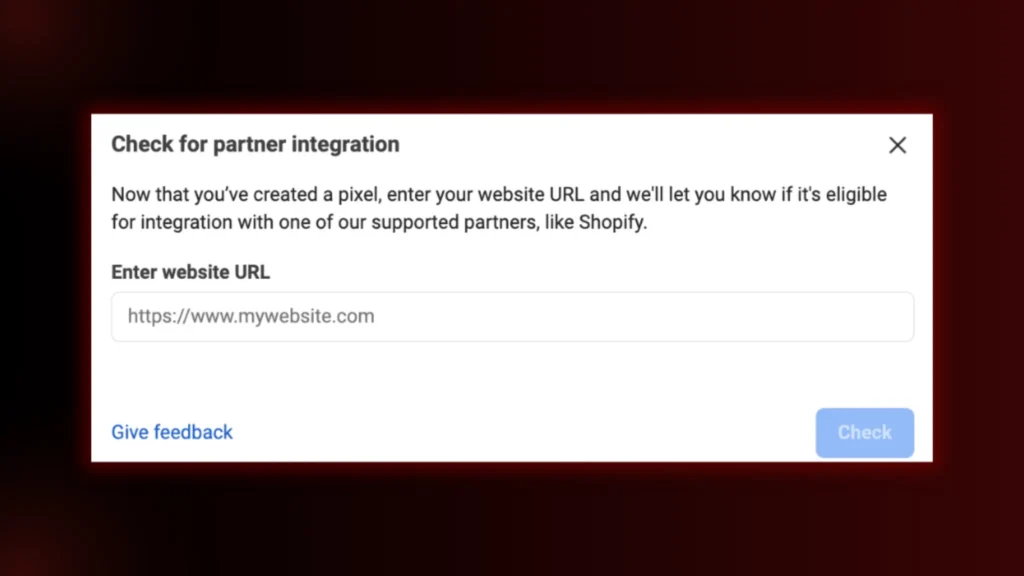
- Choose to add code using a partner integration, as shown in the picture.
- Then, select the website from the listed items.(See the image below)
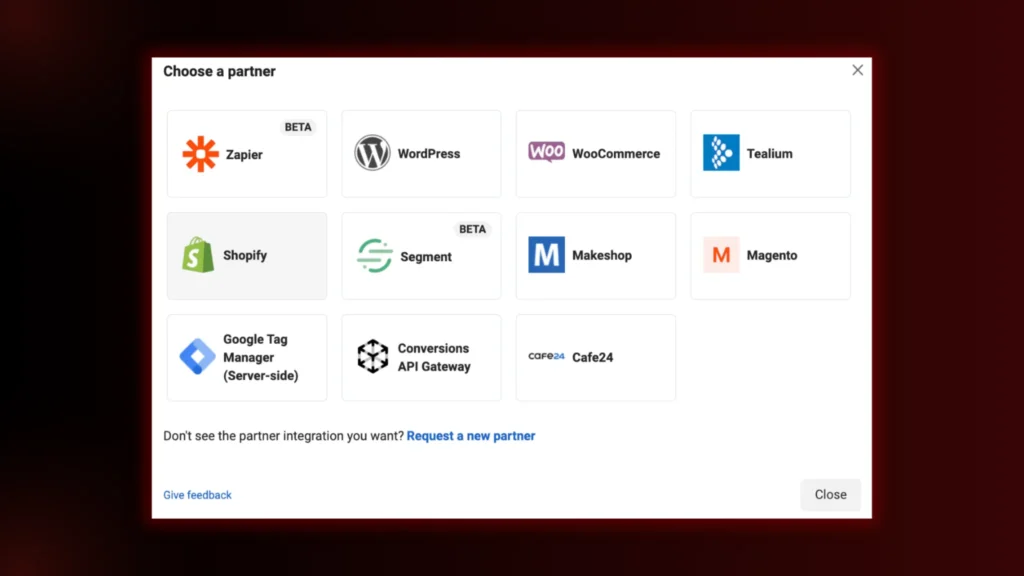
However, after that, follow the on-screen instructions specific to your platform. But, if your platform isn’t listed, select Install code manually by following the below steps:
- Copy the Pixel base code provided.
- Paste this code into your website’s HTML’s <head> section, just above the closing </head> tag.
4. Set Up Events
After installing the base code, set up events to track specific actions (e.g., purchases, sign-ups). Then, Click on Add Events in Events Manager and Choose From the Pixel.
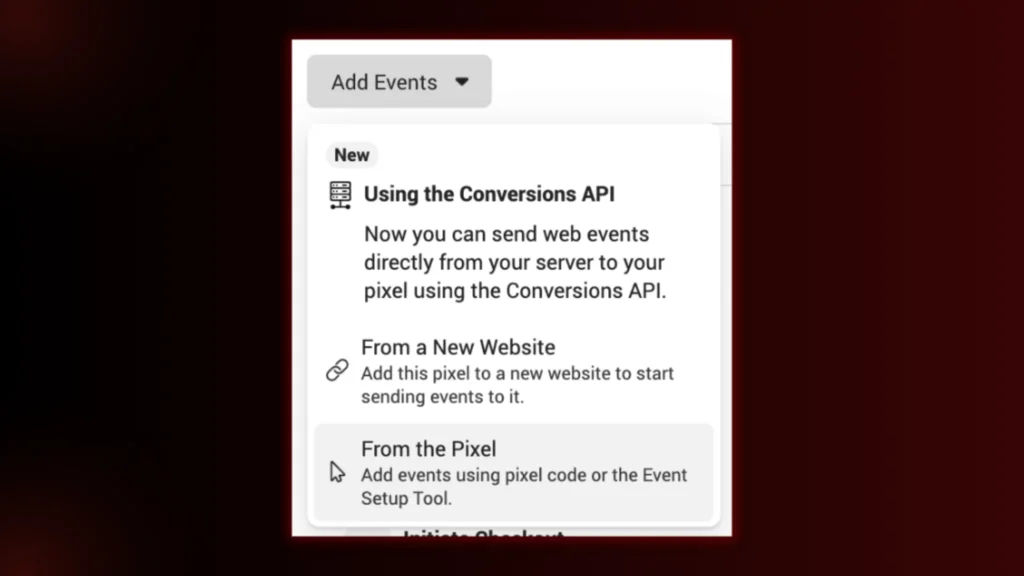
However, you should use the Event Setup Tool to define actions you want to track on your website.
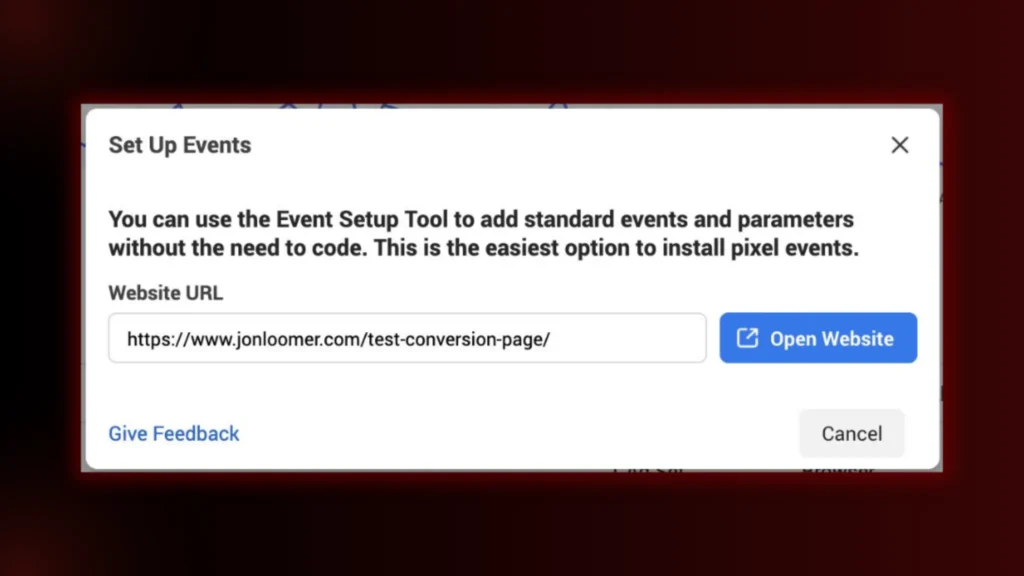
5. Verify Pixel Installation
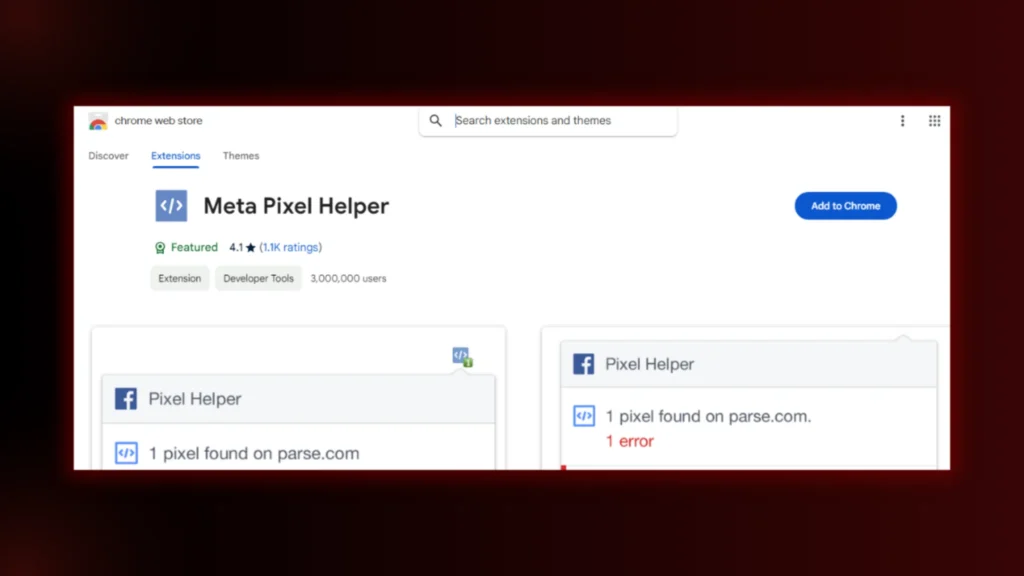
Install the Meta Pixel Helper Chrome extension to ensure your Pixel is working correctly.
How to use it? Simply visit your website and click on the extension icon. There, you will see whether the Pixel is active and functioning correctly.
Conclusion
We are confident that you must have learned what a pixel is in Facebook Ads. Also, you must have learned how to set up and manage one properly.
But remember, always name your Facebook Pixel based on your campaign goals (e.g., “Ecommerce_ConversionPixel”) to avoid confusion later. Also, regularly test your Pixel using Facebook’s Test Events Tool to ensure it’s tracking actions accurately. This ensures you gather reliable data for better ad optimization.
But if you still don’t know how to set one, you must contact our team at BrandClickX.
FAQs Related to Pixel in Facebook Ads.
How do you change the pixel on a Facebook ad set?
Changing the Pixel associated with an active Facebook ad set isn’t possible. You’ll need to create a new ad set or campaign to use a different Pixel. Before doing so, ensure the desired Pixel is properly set up and connected to your ad account.
How to Use Facebook Pixels to Track and Optimize Your Ads?
To use Facebook Pixels to track and optimize your ads:
- Install the Pixel: Add the Pixel code to your website.
- Set Up Events: Define actions like purchases or sign-ups to track.
- Analyze Data: Use Pixel insights to see which ads perform best.
- Optimize Ads: Adjust targeting, creatives, or budgets based on Pixel data.
The Pixel helps you improve ad performance and boost ROI.
How do I get a Meta pixel?
To get a Meta Pixel, follow these steps:
- Go to Events Manager: Visit Meta Events Manager.
- Create a Pixel: Click “Connect Data Sources” and select “Web.”
- Name Your Pixel: Enter a name and your website URL, then click “Continue.”
- Install the Pixel Code: Copy the code and add it to your website.
That’s it! Your Pixel is ready to start tracking data.


